Wondering about this container house design problem? >>

Show Hide

‘Shipping container architecture’ is a growing form of architecture using steel intermodal shipping containers as the main structural element. The steel is not only strong, but meant to withstand heavy loads and harsh weather conditions. Currently, the world has over 60 million shipping containers in use, making them widely available for alternative uses and a relatively inexpensive and sustainable building material.

The challenge is to design a livable home out of standard industrial shipping containers. These intermodal freight containers have a standard size of 40 by 8 feet each, and are commonly 8 feet 6 inches or 9 feet 6 inches tall. They are typically made of corrugated weathering (commonly known as the trademarked COR-TEN) steel, and have simple ‘twistlock’ corners for easy stacking, locking, and craning. These containers are ideal for construction because they can be transported to a site in so many different ways (and can carry some of the other construction materials!). They can be shipped by rail, container ship, or semi-trailer truck. However, there are some drawbacks too. The containers are not insulated and do not provide protection against heat and cold on the inside. See the list of advantages and disadvantages:

Advantages

  • Strength and durability: Shipping containers are in many ways an ideal building material. They are designed to carry heavy loads and to be stacked in high columns. They are also designed to resist harsh environments, such as on ocean-going vessels or sprayed with road salt while transported on roads. Due to their high strength, containers are useful for secure storage.
  • Modular: All shipping containers are made to standard measurements, and as such they provide modular elements that can be combined into larger structures. This simplifies design, planning and transport. As they are already designed to interlock for ease of mobility during transportation, structural construction is completed by simply emplacing them. Due to the containers' modular design, additional construction is as easy as stacking more containers. They can be stacked up to 12 high when empty.
  • Labor: The welding and cutting of steel is considered to be specialized labor and can increase construction expenses, yet overall it is still lower than conventional construction. Unlike wood frame construction, attachments must be welded or drilled to the outer skin, which is more time consuming and requires different job site equipment.
  • Transport: Pre-fabricated modules can also be easily transported by ship, truck or rail, because they already conform to standard shipping sizes.
  • Availability: Used shipping containers are available across the globe.
  • Expense: Many used containers are available at an amount that is low compared to a finished structure built by other labor-intensive means- such as bricks and mortar- which also require larger more expensive foundations. Construction involves very little labor and used shipping containers requiring only simple modification can be purchased from major transport companies for as little as US $1,200 each. Even when purchased brand new they are seldom more than US $6000.

Disadvantages

  • Temperature: Steel conducts heat very well; containers used for human occupancy in an environment with extreme temperature variations will normally have to be better insulated than most brick, block or wood structures.
  • Humidity: As noted above, single wall steel conducts heat. In temperate climates, moist interior air condenses against the steel, becoming clammy. Rust will form unless the steel is well sealed and insulated.
  • Construction site: The size and weight of the containers will, in most cases, require them to be placed by a crane or forklift. Traditional brick, block and lumber construction materials can often be moved by hand, even to upper stories.
  • Building permits: The use of steel for construction, while prevalent in industrial construction, is not widely used for residential structures. Obtaining building permits may be troublesome in some regions due to municipalities not having seen this application before.
  • Treatment of timber floors: To meet Australian government quarantine requirements most container floors when manufactured are treated with insecticides containing copper (23-25%), chromium (38-45%) and arsenic (30-37%). Before human habitation, floors should be removed and safely disposed. Units with steel floors would be preferable, if available.
  • Cargo spillages: A container can carry a wide variety of cargo during its working life. Spillages or contamination may have occurred on the inside surfaces and will have to be cleaned before habitation. Ideally all internal surfaces should be abrasive blasted to bare metal, and re-painted with a nontoxic paint system.
  • Solvents: Solvents released from paint and sealants used in manufacture might be harmful.
  • Damage While in service, containers are damaged by friction, handling collisions, and force of heavy loads overhead during ship transits. The companies will inspect containers and condemn them if cracked welds, twisted frames or pin holes are found, among other faults.

Define the problem:

  • Purpose: Create an alternative home design by repurposing shipping containers.
  • Location: Your choice. Select a site within your home’s or school’s neighborhood, which you can photograph and measure.
  • Target audience: Individuals or families interested in alternative housing solutions.
  • Size limitations: Up to four containers, 40 feet x 8 feet each
  • Materials to be used: Containers and recycled materials.
  • Budget constraints: $30,000.00 including the cost of the shipping containers, which cost about $6,000 each (see WikiHow for how to buy a shipping container)

Supplemental documents can be found here.

The problem is to design a house out of shipping containers that will meet the requirements of the costumer. I will select a site that is appropriate for the customer. The house's size limitation is up to four containers, 40 feet x 8 feet each. The materials that will be used are completely recycled materials. The most that can be spent is 30,000 and shipping containers individually cost 6,000.

Curious about the Collect Info step of this bus shelter design problem? >>

Show Hide

In the Collect Info step of the design process, you try to gather as much information as possible about shipping containers and your site, along with the people who will use it. You can't propose solutions until you figure out and document the design problem.

Try This

  • Start off the project by analyzing what you already know about container architecture and container housing with a quick pre-test.
  • Measure out a full-scale plan of a container using a measuring tape. This will help you visualize the full size of a shipping container.
  • Make a list of the features you want this home to have. What is important? Remember, you only have up to 4 containers. Is living space most important, or the number and size of bedrooms?
  • Consider the size of your site. There may only be a certain way the shipping containers can fit on the site, so try a few different combinations of the containers, including putting them in multiple levels.

Think About

  • How many people will be living in this home? What are their ages and genders? What do they do? How much space does each person need? What kinds of living spaces will this family need? How many bedrooms and bathrooms?
  • Where is the site for this container house? What makes this site unique? Is it narrow? Square? This will dictate how you can configure multiple containers.
  • What basic necessities will you need to add to make this space livable? For example, you will need to add plumbing, electricity, and insulation. What else is needed?
  • How will the outdoor space be used?

tblundetto's work for the Collect Information step:

Summary
There will be 2 people living in the container house. These people are married. This married couple have a day job 5 days out of the week.
This site is located in the beautiful mountains of Vermont. This is a very unique spot for the two...
There will be 2 people living in the container house. These people are married. This married couple...
Stowe Vermont is one of the most popular city's in Vermont. With that being said this location...
This house will have to have plumbing, electricity, insulation, heating, air conditioning, and a...
This is the land that they will be living on. It has a lake in the front of there yard, the house...
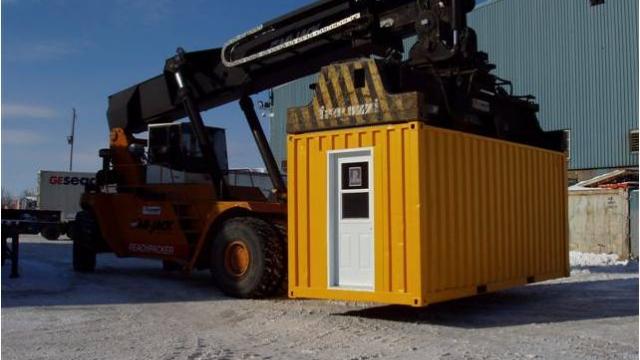
As seen in this picture the container houses can with stand any weather that is in the forecast....

Curious about the Brainstorm Ideas step of this container house design project? >>

Show Hide

In the Brainstorm Ideas step of the design process, you put some early ideas down on paper that show what you've found in the Collect Info step. You also might take more photos to show specific new ideas you have. 

The simple diagrams you make here will help you understand how the site location and design compare with your new ideas.

Think About

  • Spend some time looking at the aerial photo of your site.  What types of other buildings surround your site?  Homes, businesses, parks, parking lots, or an empty field?  How will these other buildings impact the design of your home?
  • What types of streets surround your site? Are they busy or quiet? 
  • On a piece of tracing paper placed over the aerial photo of your site, sketch a diagram showing a large arc around the building to show the path of the sun throughout the day.  This drawing is called a site analysis diagram (Remember, the sun rises in the east and sets in the west).
  • Draw other lines on this diagram to indicate the best views around the site.
  • Based on the site analysis diagram you've sketched, where is the sun located throughout the day? 
  • How can the indoor and outdoor rooms  be positioned to take advantage of the sunlight for good lighting?

tblundetto's work for the Brainstorm Ideas step:

Summary
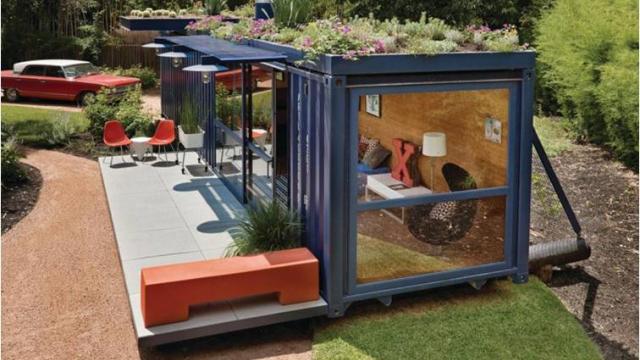
in the brainstorming process of determined what i think i want the house to look like and where the house will be located.
the front view of the container house
The side view of the container house
this is a picture of what i think will be suitable set up for the family to live in.
the two top floors will be where the rooms are and the deck. the bottom floors will be the kitchen...
this is where the house will be located. It is in Stowe Vermont in the beautiful mountains.

Curious about the Develop Solutions step of this container house design project? >>

Show Hide

In the Develop Solutions step, your rough ideas come together with drawings and models that can show others your solutions for a shipping container home.

Important! Since DiscoverDesign is about investigating the design process, the other people viewing your project - other students around the country, your teacher, and mentors - want to see how your ideas have changed over time. This means that while you're working on your digital model, you’ll want to be sure to keep re-saving it with a new file name every few days as you work through the steps.

Draw a sketch or use software such as Google SketchUp, AutoCAD, or Revit to illustrate your ideas.  You can upload photos (JPG files) from your SketchUp model, video fly throughs (FLV files) of your SketchUp model, or drawings (DWF files) from AutoCAD.


tblundetto's work for the Develop Solutions step:

Summary
this is how my house is starting to look
this is a 3D image of my house
north
east
south
west
floor plans
front 3D view

Curious about the Final step of this container house design problem? >>

Show Hide

The final step of the design process is to create more finished drawings that illustrate your ideas to others. Remember, your explanation text, and the types of drawings, images, and models you share need to tell the whole story of your project to someone who may or may not have ever visited your site or even your city.

Continue to collect feedback from your peers, teachers and the online community to help you improve on your final design. Be sure to review and add constructive comments on the work of other students who are solving the same design problem. If your ideas change, be sure to explain your thinking and let others know about the new work you have posted to your account.

You might want to share floor plans, elevations, renderings of your digital model, photos of a physical model, or a video animation of your model.

  • Review your design and test it against your original problem statement that you wrote for the Overview. Does it meet this criteria?
  • Make a list of your ideas, sketches, and study models. For your final design you will want to write and post a short but effective paragraph of your process and the unique solutions you found developed. Tell us about your ideas.
  • Your teacher and architectural mentors will be looking for these things:
    1. originality in your design
    2. your ability to creatively solve the design challenge
    3. the quality of images, sketches, drawings, and models you have uploaded in each of the five design process steps (Overview, Collect Info, Brainstorm Ideas, Develop Solutions, and Final Design). 
    4. how well you have written about and explained your thinking in each of the design process steps

tblundetto's work for the Final Design step:

Summary
This is the final design of my container house. This house is designed for a couple that may have a family. This house includes suitable living space for everyone.
This is the final 3D image of the container house. It shows the property and outside deck .
This is the final 3D design and showing what it would look like from the front and the road.
These are all 4 of my elevation plans. Includes north, east, south, and west.
This is a render from the side of the house giving more of a realistic view of what it would look...
This is a render to show a realistic view of what it would look like from someone standing in front...
This is my first floor floor plans. On the first floor there is a guest room with two bunk beds in...
The second floor floor plans show the large deck and the inside of the second floor. On the inside...

Earn Skill Badges

Twitter Feed