Curious about the instructions for this bike shelter design problem? >>

Show Hide

Welcome Chicago Public High School students!
These are the instructions for entering a project in Division 6 for the 2012 Newhouse Architecture Competition.

Bike racks and bike rider amenities are given little attention when schools are planned, and bike riders have little infrastructure support for their choice to ride to work or school.

In order to support healthy lifestyles we are asking you to design a bike shelter that will provide safe and secure storage, protection from Chicago weather (year around), and some amenities that would be helpful for bike riders to have when they reach school.

The project will either replace your existing bike storage area OR you can find a new location that would better serve the school. You must identify and justify the new location (eg. - visibility is better, or there is more room to maneuver).

Check out the video below to get inspiration: 


Transportation is always an issue when you're trying to get to school. "Should I walk? Or maybe take the bus or train? It's too hot to ride my bike, I'll start sweating if I bike it to school. It's raining, my bike will get wet" are all common when discussing how to get to school. Chicago weather is it a bit bizarre, one day it's nice and sunny, the next day there's thunderstorms. Creating an addition to Juarez would give students as well as teachers the option to comfortably ride their bicycle's to school without any hesitation. The bike shelter will accommodate storage for Juarez students and staff. In addition to storage, the bike shelter will include a lounge area for relaxation, restrooms, locker rooms and showers, as well as a repair/maintenance shop. A bonus to the locker rooms is the heated flooring, most locker rooms are freezing cold, and nobody wants that in a Chicago winter. The heated flooring would be set at a moderate but warm temperature. The bicycles kept in this facility would be protected from the harsh weather and they will be kept safe.

Curious about the instructions for this bike shelter design problem? >>

Show Hide

In the Collect Info step of the design process, you try to gather as much information as possible about your school's existing bike storage facilities, along with the students and staff who will use it.  You can't propose new solutions until you figure out and document what the existing problems are.

Try This

  • Do a site visit of your bicycle parking facilities and make notes, sketches, and take photographs. Note conditions that are unsafe, unsecure, or that are less than ideal.
  • Look at other schools or public facilities to determine good / bad examples of how bikes are stored and if anything is done to accommodate riders needs when they get off their bike.
  • Interview bike users and ask them what they would like to have in a bike shelter at their school or place of work.   
  • Calculate the number of bikes that park over a week, also inquire if bikes are registered with the main office and if so how many are registered with the school.
  • Do an analysis at different times of the day and week and create an analysis with average usage and high / low points. Also determine if there are more bikes at the beginning of the week or end of the week.
  • Measure and draw the existing bike parking area and locate and note existing structures such as fencing, bike rack (notate the type and material), show the size of a bike and its clearances on the plan. Include dimensions.

ajuarez17's work for the Collect Information step:

Summary
Existing bike racks are in an open space, they are typical bike racks you see on any street. They are visible and not blocked in any way from the public.
Existing bike racks near the front entrance of the school.
Existing bike racks in the back area of the school.
Bike shelter site plan.
Lockers would be added to the facility for extra storage.
The cars in the photo have been taking up space for a long time, a bike shelter would serve as a...
Small bike rack area.
Sketch of the bike shelter.

Curious about the instructions for this bike shelter design problem? >>

Show Hide

In the Brainstorm Ideas step of the design process, you put some early ideas down on paper that show what you've found in the Collect Info step. 

Try This

  • As you are observing and making notes think about how your bike shelter is taking shape. Make side notes of where new elements may go or how you would change what is currently in place.
  • Take note of unsafe conditions or conditions that do not make sense (For example, bicycles sticking out into a sidewalk or people having difficulty parking their bikes).
  • Sit and study photographs of your site visit. If you can print and write comments of what you remember and note where you might change things and how.

Test

ajuarez17's work for the Brainstorm Ideas step:

Summary
As a bike rider, not having access to a safe storage area for bike kept me from riding my bike to school.
Existing bike racks would stay in place.
These existing bike racks would be removed, these are in the back entrance, where no one can enter...
Make room for a better facility.
Sketch of the facility.

Curious about the instructions for this bike shelter design problem? >>

Show Hide

In the Develop Solutions step, your rough ideas come together with drawings and models that can show others your solutions for a new bike shelter.

Try This

  • Try out different ideas and save each “version”. You do not want to lose a good idea later!  Other people viewing your project - other students around the country, your teacher, and mentors - want to see how your ideas have changed over time. This means that while you're working on your digital model, you’ll want to be sure to keep re-saving it with a new file name every few days as you work through the steps.
  • Make a list of your ideas and associated sketches, or practice models. For your final upload you will want to write a short but effective paragraph of your process and what you found. This will inform the direction you will take for the final solution.
  • Show your ideas to your teacher and peers for some feedback. You can also review your progress with the test group you may have interviewed and test whether your design would meet their needs or address their concerns. Learn from the feedback you receive and incorporate into your final design solution.
  • Review your design and test it against your own observations and review that it has met the project requirements. Did it meet the expectations of the end users that you spoke to?
  • Do not leave work for the last minute! Going through a detailed design process requires time to gather information, develop ideas, and make improvements. This is difficult or impossible if you try to pull everything together a week before your project is due. Projects that are researched, developed, and well executed will always stand out!


ajuarez17's work for the Develop Solutions step:

Summary
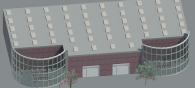
I used my sketches to create a simple design in Revit.
Top view of the bike shelter, no roof added yet. Still missing some items and different flooring.
Floor plan of the bike shelter.
Ceiling plan of the facility.
Top view, with flooring. (Not the final decision on the floor type)
First plan, with solar panel roof. (Solar panels were spaced out, and there was too many)
Building with two people, one outside one inside(near the inside door on the left)

Curious about the instructions for this bike shelter design problem? >>

Show Hide

The final step of the design process is to create more finished drawings that illustrate your ideas to others. Remember, your explanation text, and the types of drawings, images, and models you share need to tell the whole story of your project to someone who may or may not have ever visited your school.

Be sure that you understand and meet all schedule deadlines and project data submission requirements.  

The Newhouse Competition judges will be evaluating your design project on:

  • The creativity of the final solution.
  • If you have included all studies, observations, data, and calculations utilized for determining capacities, design considerations, and scale of final project.
  • How well you showed the design process through sketches, notes, pictures, etc.
  • How well your projects incorporates the following components:

    Secure bike storage using common bike parking structures (bike racks), or some type of creative structure that is an “improvement” to what is currently installed and utilized at the school.

    Shelter from the weather – it can be enclosed or partially enclosed.

    Basic amenities: clean up or private shower facilities, personal lockers, small food kiosk or beverage bar, considerations for self performing bike maintenance, bike storage, information board(s).

    Consideration for use at all hours and seasons.


ajuarez17's work for the Final Design step:

Summary
After talking to various people and going through all my ideas, I kept the bike shelter pretty much the same as it was in the Developing Solutions part of the project, with a few changes.
Solar panels would reduce the expenses and energy used to power the building.
View of the facility through a person's eyes.
Men's washroom, locker room and showers. (Wall was taken off to get a better view of the area)
Women's washroom, locker room and shower ares. (Wall taken off to get a better view)
Repair/maintenance area. (No roof, to show the inside)
Left wing of the storage area, for bicycles.
Final rendering of the facility.

Earn Skill Badges

Twitter Feed