Curious about the instructions for this bike shelter design problem? >>

Show Hide

Welcome Chicago Public High School students!
These are the instructions for entering a project in Division 6 for the 2012 Newhouse Architecture Competition.

Bike racks and bike rider amenities are given little attention when schools are planned, and bike riders have little infrastructure support for their choice to ride to work or school.

In order to support healthy lifestyles we are asking you to design a bike shelter that will provide safe and secure storage, protection from Chicago weather (year around), and some amenities that would be helpful for bike riders to have when they reach school.

The project will either replace your existing bike storage area OR you can find a new location that would better serve the school. You must identify and justify the new location (eg. - visibility is better, or there is more room to maneuver).

Check out the video below to get inspiration: 


This new idea of a bike shelter inside the school where a large room isn’t being used would be available and useful for the students and staff. This bike shelter is a unique idea because the shelter is inside the school not causing problems.
Being able to build a bike shelter in Curie High School would be very useful for the students who ride their bikes, and the school itself. This new idea could make unused space into a very useful space. Creating the bike shelter can make student’s everyday routine easier, by them using a bike instead of the public transit. With a new bike shelter in curie students can begin cycling to school more often. This could benefit the students because it’s good for their health, also they don’t have to waste their money to get to school.
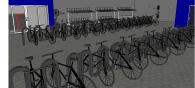
Making use of this open space that’s not being use and that would fit the idea of a new bike shelter is benefiting both the school and the students. With the shelter the students won’t worry about their bikes getting robbed. If the shelter would be built then more students would be influence to bring their bikes to school. This entire idea would be created on an unused room that was for a program that they shut down recently. This room where the bike shelter could be built in provides two closets one big and one small; this could be used for tools and to fix the bike on the spot.

Comments

You need additional sketches. Where are your pictures? Also, sketches should be under the Brainstorming tab.

You apparently didn't read my last comment. Where are your pictures? And your sketches are in the wrong place. You need to use your time more wisely during class.

What have you been doing ? This is not two weeks of work. You need to focus on the completion of this project.

Just a friendly reminder, you must upload photos and text for each step of the design process to be eligible for judging in the competition. Good luck!

Curious about the instructions for this bike shelter design problem? >>

Show Hide

In the Collect Info step of the design process, you try to gather as much information as possible about your school's existing bike storage facilities, along with the students and staff who will use it.  You can't propose new solutions until you figure out and document what the existing problems are.

Try This

  • Do a site visit of your bicycle parking facilities and make notes, sketches, and take photographs. Note conditions that are unsafe, unsecure, or that are less than ideal.
  • Look at other schools or public facilities to determine good / bad examples of how bikes are stored and if anything is done to accommodate riders needs when they get off their bike.
  • Interview bike users and ask them what they would like to have in a bike shelter at their school or place of work.   
  • Calculate the number of bikes that park over a week, also inquire if bikes are registered with the main office and if so how many are registered with the school.
  • Do an analysis at different times of the day and week and create an analysis with average usage and high / low points. Also determine if there are more bikes at the beginning of the week or end of the week.
  • Measure and draw the existing bike parking area and locate and note existing structures such as fencing, bike rack (notate the type and material), show the size of a bike and its clearances on the plan. Include dimensions.

Mr.JDM12's work for the Collect Information step:

Summary
I did a survey on people from curie to see how many people would actually use this new bike shelter.
This is a sketch of how the two different bike racks would be design.
This sketch is a floor plan view of where the bike shelters would be placed
This is the floor plan of the actual room, where the bike shelter would be built.
There was a survey conducted in Curie H.S to collect information on how many people would or wouldn...
Curie's site plan and place where the Bike Shelter is located at
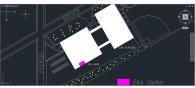
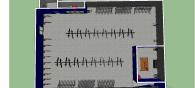
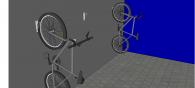
This is the room of curie thats not being used and we are making this as the model to design the...
Another picture of the room.

Curious about the instructions for this bike shelter design problem? >>

Show Hide

In the Brainstorm Ideas step of the design process, you put some early ideas down on paper that show what you've found in the Collect Info step. 

Try This

  • As you are observing and making notes think about how your bike shelter is taking shape. Make side notes of where new elements may go or how you would change what is currently in place.
  • Take note of unsafe conditions or conditions that do not make sense (For example, bicycles sticking out into a sidewalk or people having difficulty parking their bikes).
  • Sit and study photographs of your site visit. If you can print and write comments of what you remember and note where you might change things and how.

Test

Mr.JDM12's work for the Brainstorm Ideas step:

Summary
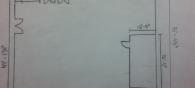
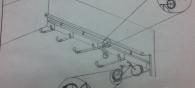
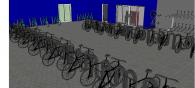
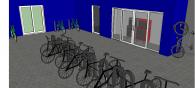
I began to brainstorm by doing sketches of how could the room look with all the bike shelters, and also doing a floor plan with the bike racks.
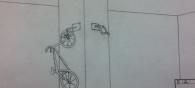
Here is an image of how could this type of bike rack could be used on a pillar, to make usage of...
Brainstorm of how the bike shelter could look.
This was an idea of where could the bike racks be placed.

Curious about the instructions for this bike shelter design problem? >>

Show Hide

In the Develop Solutions step, your rough ideas come together with drawings and models that can show others your solutions for a new bike shelter.

Try This

  • Try out different ideas and save each “version”. You do not want to lose a good idea later!  Other people viewing your project - other students around the country, your teacher, and mentors - want to see how your ideas have changed over time. This means that while you're working on your digital model, you’ll want to be sure to keep re-saving it with a new file name every few days as you work through the steps.
  • Make a list of your ideas and associated sketches, or practice models. For your final upload you will want to write a short but effective paragraph of your process and what you found. This will inform the direction you will take for the final solution.
  • Show your ideas to your teacher and peers for some feedback. You can also review your progress with the test group you may have interviewed and test whether your design would meet their needs or address their concerns. Learn from the feedback you receive and incorporate into your final design solution.
  • Review your design and test it against your own observations and review that it has met the project requirements. Did it meet the expectations of the end users that you spoke to?
  • Do not leave work for the last minute! Going through a detailed design process requires time to gather information, develop ideas, and make improvements. This is difficult or impossible if you try to pull everything together a week before your project is due. Projects that are researched, developed, and well executed will always stand out!


Mr.JDM12's work for the Develop Solutions step:

The student did not provide any content for this step.

Curious about the instructions for this bike shelter design problem? >>

Show Hide

The final step of the design process is to create more finished drawings that illustrate your ideas to others. Remember, your explanation text, and the types of drawings, images, and models you share need to tell the whole story of your project to someone who may or may not have ever visited your school.

Be sure that you understand and meet all schedule deadlines and project data submission requirements.  

The Newhouse Competition judges will be evaluating your design project on:

  • The creativity of the final solution.
  • If you have included all studies, observations, data, and calculations utilized for determining capacities, design considerations, and scale of final project.
  • How well you showed the design process through sketches, notes, pictures, etc.
  • How well your projects incorporates the following components:

    Secure bike storage using common bike parking structures (bike racks), or some type of creative structure that is an “improvement” to what is currently installed and utilized at the school.

    Shelter from the weather – it can be enclosed or partially enclosed.

    Basic amenities: clean up or private shower facilities, personal lockers, small food kiosk or beverage bar, considerations for self performing bike maintenance, bike storage, information board(s).

    Consideration for use at all hours and seasons.


Mr.JDM12's work for the Final Design step:

Summary
This bike shelter consists of one room to be used as a repair shop. It also has doors that open automatic when you press a button to make your entrance or exit easier.
Final Floor Plan
Interior view of the bike shelter room.
Wall Bike rack
This is the view from the other corner of the entrance.
Main entrance view.
Here we got the entrance to the room and the closet where the tools are stored.
Ramp to exit outside the building.