Overview Instructions

Show Hide

Design an efficient snack stand or cart for High Point Regional High School that is liked by students and the administration. The stand or cart must be within the size constraints of 10' height, 4' depth, and 12' width. It must sell healthy food, have a sign, display the food products, place to store money, have electricity, and security features.

Comments

.

Collect Instructions

Show Hide

Gather more information about your existing school by taking photos, sketching, conducting interviews, or doing additional research.

Think About

  • Which location or entrance around your school campus receives the most student foot traffic? 
  • What types of healthy food options are currently available to students?
  • What types of food do you think the new stand needs to accommodate?

Try This

  • Use Google Maps to view and print out an aerial photograph of your school.  Mark the different entrances to your school building on the aerial photograph.  Does your school have separate entrances for students and staff members?
  • Interview the school nurse, a health teacher, or the head cook and ask them their opinions about the types of healthy food currently available at school.  What improvements could be made with a new food stand?
  • Interview several classmates about where they think would be a good location for a new food stand.
  • Walk around the exterior of your school and take photos of possible locations for the new food stand.
  • Research other food vendor stands or carts.  Or search Flickr for "food cart", "street vendor", or "fruit kiosk" images.

mderin5's work for the Collect Information step:

Summary
Constraints: Height: 10', Length: 12', Width: 4' Requirements: Healthy, Sign, Display, Register, Electricity, Security
Location: Front of school in patch of grass. Put Cement slab to roll cart onto and run electric...
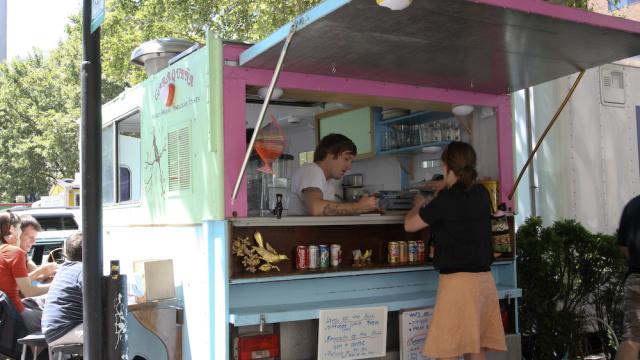
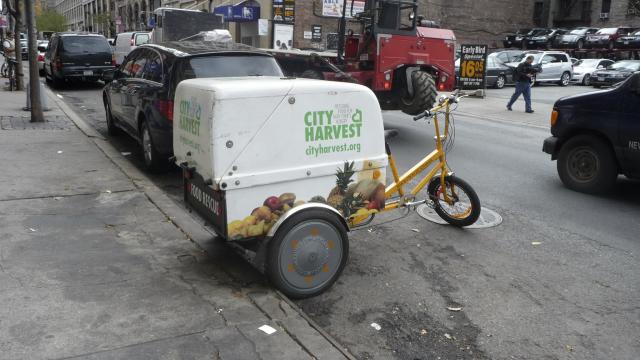
This picture has a lot of similar features that I would like to incorporate in my stand. The idea I...
SURVEY: Coffee-11 cereal-2 bagels-10 breakfast wrap(ham,cheese,eggs)-16 Egg,bacon,cheese...
This is a layout of High Point Regional High school. The red Lines represent designated bus drop...
This will be our biggest seller for food. Its a taylorham, egg, and cheese in a roll. It is very...
This will be another big seller. We will have one or two give gallon coffee containers so we do...
Maintenance will be very easy for this stand. You will just need to wipe everything down and wash...

Brainstorm Instructions

Show Hide

Develop sketches or models to help you puzzle through new ideas and solutions.

The food stand or cart will need the following types of features

  • signage
  • a place to display food
  • a place for money to be stored securely
  • a place for some types of food to be refrigerated
  • a place for some types of food to be kept warm
  • additional storage space
  • a method for getting electrical power to the cart or stand
  • a method for either moving the cart from one location to another at night, and / or a method for securing and storing its contents when the stand is closed

Try This

  • Identify a location for your new food stand or cart.  Mark this on the aerial photograph.  Will it be located at an entrance near your school's cafeteria, or will it be near a main entrance?  You decide.  
  • Consider the path of the sun around your school building.  You may want to consider how the vendor operating the food stand (and the food they are selling) might be protected from the sun on a hot day.   
  • Using a tape measure and some masking tape, mark out the maximize size for the stand (12 feet long x 4 feet wide) on the floor of your classroom.  Mark the maximum height of the stand (10 feet high) in masking tape along the wall of your classroom.  This full-scale outline will help you understand the size of the object you are trying to design.
  • Make lots of sketches to get your early ideas down on paper.  Learn from each different idea. 
  • Brainstorm a list of special features you’d like the food stand to have. 
  • Consider what materials the stand will be made from.  What materials will be durable against the weather?

mderin5's work for the Brainstorm Ideas step:

Summary
This is the idea I will be using for my final design.
This is one of the designs I came up with that did not make it to the final design.
This is some ideas that were jotted down on paper.
This is a drawing of where my stand will be and the flow of traffic.
This is another design that did not make it to the final design.
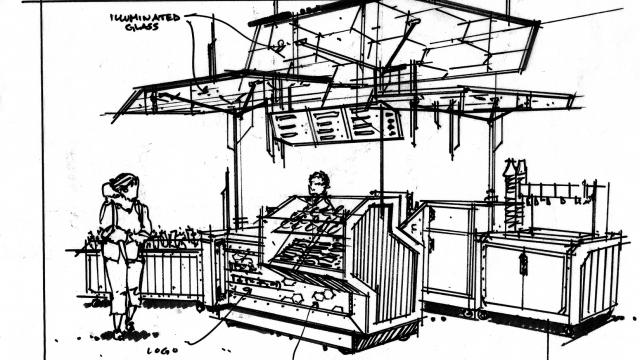
This is a sketch of what a front view of my stand will look like, during work and no during work...

Develop Instructions

Show Hide

Now's the time to take what you've learned from the steps above and develop your own solution for a new food stand or cart.

Try This

  • If possible, use cardboard or cardstock to build a rough physical study model or prototype of your food stand. You can't really understand the stand's shape until you make a quick study model. Don't worry about making a fancy finished model at this time. Instead, use cardstock, scissors, and tape to quickly create the large 3D form. See how it looks. Break off different sections, add new pieces, and try new ideas. Take photos of your model.
  • Sketch or use software such as Google SketchUp, AutoCAD, or Revit to put your ideas on paper.

mderin5's work for the Develop Solutions step:

Summary
For the developed solution step I took my sketches from the brainstorming step and recreated them in revit.

Final Instructions

Show Hide

Congratulations on developing a final design! Use this step to upload the best drawings, screen captures, photos, etc. of your design. You want to be sure to pick images that show interesting details and help your viewer understand the space. 

For example, make sure you have a few images that help us understand things like where your foodcart is located around the school and what it looks like from the customer's and the sales person's perspective.

Don't forget to get feedback from others in your class or on DiscoverDesign, and teachers and mentors. Feedback is an important step of the design process to help you create the best design for the challenge.

Keep designing!


mderin5's work for the Final Design step:

Summary
This was my final design.

Earn Skill Badges

Twitter Feed