This project has been archived. To make it an active project, contact your teacher or the site administrator.

This CAF Newhouse 2011 project (#296) was awarded Third Prize

Wondering about this bus shelter design problem? >>

Show Hide

Due to rapid increase in population and shift towards urban migration, a rising trend across the world for mass transit. Bus Rapid Transit (BRT) is a cost-effective and efficient way to move people through their cities. BRT is less permanent and less expensive that rail systems (like the EL), and can move people just as effectively in many cities. Chicago has already brought one route of BRT (the Jeffrey Jump) to the city as an experiment, and is planning two additional routes along the Western and Ashland corridors.

Unlike typical bus stops, BRT stops are meant to be less frequent along routes, making the commute faster and accommodate more people. It is up to you to design how this new type of transit shelter will function and protect passengers from the weather and provide information and other amenities while they are waiting. Other amenities may important to include with the shelter can be a secure bike storage or a ‘Share-a-Bike’ station such as “the Divvy” in Chicago, a place or screen that provides relevant information. A shelter is a structure that we may take for granted, but BRT shelters also have the potential to make our daily lives easier while also significantly impacting the way our streets look.

Define problem

  • Design a BRT intersection (in group): Configure BRT and other vehicular and non-vehicular lanes and sidewalks. Design the intersection to move pedestrians and bikes to the BRT shelter.
  • Design a BRT shelter (individually) to accommodate minimum of 25 people

Take into consideration

For the Intersection:

  • Amount of vehicular traffic,
  • Amount of pedestrian and other non-vehicular traffic
  • Estimated frequency for the BRT
  • Estimated riders at the location
  • Adjacent uses

For the BRT shelter:

  • Ticket or Point of Pay location
  • Ease of loading and unloading
  • Weather protection
  • Safety
  • Place or method for providing information
  • Connectivity to other mode of transport such as bikes, walking etc
  • Energy and roof drainage
  • Other amenities

Provide information about the intersection/stop selected; 63rd and Jeffrey, 35th and Ashland, including drawings..

Supplemental documents can be found here.

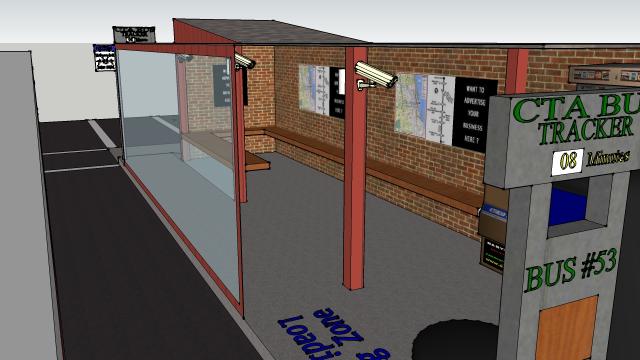
There are many clear and present problems with many existing bus shelters. Some bus shelters have a greater importance and role in lives. Some bus shelters are used more often than others, and some bus stops only have a bus sign; no bench and no protection. Bus shelters are usually placed at busy, main streets where buses get crowded. The bus stop by my school has a bus shelter but it holds about 3-4 students of the 30+ students awaiting a bus after school. The biggest concern I took notice of when designing my bus shelter is space. I expanded the bus shelter and included a bench that wraps around in order to seat students. I also set back the bus shelter and put a roof overhanging in order to allow students to stand and remain protected. On rainy days, students are left in the open to face the brutal wind and thunderstorms. The overhanging roof will allow students to remain protected while standing even if there is no room to sit. While buses help transport large amounts of people, including students, they cause alot of traffic due to the wait for students to pay. Most students get on the bus and fumble to find change and bills because they do not have a bus card. Bus card machines are found in train stations, not bus shelters. In order for a person to get a bus card and/or add money to one they have to walk to a train station. I included two bus card machines and an ATM so students won't have to walk to a train station and to help with the flow of students onto the buses. In order to insure safety at all hours of the day, I included security cameras. While most students await a bus around 3, some students do not leave the school until 7 due to sports and other extracurricular activities. I added lights to the bus shelter that go on as the streetlights go on. These lights help see, navigate, and they are there for a sense of safety as well. Along with the ATM and bus card machines, I including a vending machine to sell drinks. The vending machine not only keeps students refreshed throughout the year, but also helps raise funds to pay for the new bus shelter. Although the bus shelter is elevated, an advantage in the winter, I including a ramp to make it accesible by anyone. The bus shelter includes a large water proof glass, protecting students and others from wind, rain, and even water and snow splashing at them. Last but not least, I included two
CTA bus trackers to notify students of the arrival time of the next bus.

Comments

Spence you are making great progress on your project keep up the good work.. (=

i take it back you have no progress

I agree with Jorge where is your progress????????????????????????
Design Process??????????????????????
Design Steps??????????????????????????

Hey sb1827, Now that you have a new model of your project, please replace your portfolio cover image with one of these. We want to see YOUR original design work show up in the Student Gallery. Thanks!

hey pal, dropping by to wish you the best of luck, your project turned out wonderful

Spencer replace your design as jmasengarb recommends. I see more improvements in your design than are talked about in your textual comments. Edit this part & include in your final design. Midnight 5-18-11. Enumerate the problems that were solved by your design.

Thanks for entering the 2011 CAF Newhouse Architecture Competition! Until the judges have completed evaluating all student projects, you are temporarily blocked from accessing your account or working on this project. Please check back sometime after May 26 for the competition results. Good luck!

Great project! You've really thought through the needs of the students and applied them well. The card vending machines and ATM are well-thought out; though it might be impractical to place them at every stop in the city, they seem like a no-brainer for high-traffic stops such as yours. In fact, this is beyond the bounds of your project, but in many cities around the world, you actually pay at the bus stop before getting on, similar to the L. It's a great idea to speed things up, and you've clearly come at a similar solution for the same reasons. Good job all around.

Very well done. I appreciate your research and thoughtfulness about the existing issues and how you have chosen to solve them through your concept. Excellent final renderings.

Very well thought out design. Great job thinking about the functionality of the bus shelter and how it can be improved & integrated into a new design. Excellent work completing each phase of the process and of adding to & improving upon your original ideas for the final design.

You have done a very good job of identifying the issues and working toward resolving them. Using durable materials, adjusting the size of this shelter to the needs of the location with lots of seating and other amenities, etc. have all come together to create a compelling project. Very good job!

Your design addresses several of the challenges you identified in your initial research. You've done a fine job with bringing your vision to life through the digital renderings. Very mid-century modern. Would have been interesting to consider utilizing modern building materials in your design vs. brick/tar & shingle roof, etc. Overall, great job.

Congratulations!  Your project has been awarded a Third Prize by the 2011 Newhouse Architecture Competition jury yesterday.  To celebrate your awesome work, we’re including this project as a ‘Featured Student Project’ on the website.  It will now appear in the sidebar of the Student Gallery and on the homepage in the rotating queue. 
.
Share this link to your project with your friends on your Facebook page! 
.
Don’t forget to bring your family with you to the awards ceremony and exhibition opening on the evening of Thursday, June 2. (Details will follow in an email.)  You can also visit the Robert Morris University Gallery between now and June 11 to see your project on display along with all the student projects.  Congrats again!

Curious about the Collect Info step of this bus shelter design problem? >>

Show Hide

The re-branded CTA BRT route, the Jeffery Jump

In this step of the design process, you’ll want to gather as much information as possible about different types of shelters, from regular bus shelters to train shelters. How are they different? How do people use them? Since BRT is new to Chicago, you’ll also want to look at BRT stations that have been designed in other countries. Interview bus riders about how they use the current type of bus shelter and what is missing in their design.

Think About

  • Start off the project by analyzing what you already know about container architecture and container housing with a quick pre-test.
  • What are the basic functions and design elements of any bus shelter?
  • What materials are these shelters made from?
  • How could current bus shelters be scaled up to accommodate more people and longer wait times?
  • What are some things that you really like or hate about Chicago’s current bus shelters?

 Try This

  • Make a list of all the different features on an existing Chicago bus shelter.  Explain what you’ve learned and post information the information in this step.
  • Learn about the BRT system. How does it work? How are the station locations determined? What makes a BRT system different than a regular bus route?
  • Use Flickr and Google Images to search "BRT shelter." Research different types of bus stops and shelters in different cities around the world. How are these different than regular bus shelters?
  • Use Google Maps to view and print out an aerial photograph of your intersection. How far away is the stop from the street corner? How far away should it be?
  • Interview several of your friends and classmates about what they like or hate about the bus shelters you typically use. 
  • Check out this Chicago Tribune article from architecture critic Blair Kamin about the 2003 design of Chicago's bus shelters by a French company.
  • This blog about bus shelter designs have some very interesting ideas from all over the world.

sb1827's work for the Collect Information step:

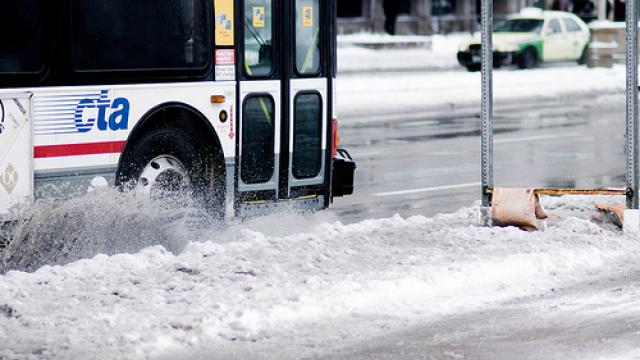
In order to collect information, I observed the bus shelter after school. Within 10 minutes of the final school bell ringing, 29 students were packed at the one bus shelter. Of the 29 students, 4 were able to actually take advantage of the bus shelter and sit down. The other 25 students had to stand out in the open, tired after the long school day.

Curious about the Brainstorm Ideas step of this bus shelter design project? >>

Show Hide

A TransMilenio Station in Bogotá, Colombia

In the this step of the design process, you’ll want put some early ideas down on paper that show what you've found in the Collect Info step.  You also might take more photos to show specific new ideas you have. 

Make some early decisions about the location, size, features, and materials for your BRT shelter. Draw a hand sketch to help you puzzle through new ideas.

Try This

  • Identify a location for your BRT shelter on your site near your intersection. Mark this location on a map and think about its proximity to other bus stops, rail stations, or other points of interest near this intersection.
  • Based on what you learned in the Collect Information, make a list of all the features you'd like to have in your design. Edit this list into ‘necessities’ and ‘nice to have’ categories.
  • Using a tape measure and some masking tape, mark out some different footprint options for the shelter. How many people do you need to accommodate? How much space should each person get? How does this compare with the size of a regular bus shelter?  Explain your thinking in the description of your project.
  • Draw several quick sketches to get your early ideas down on paper.  Either take a photo or scan and then upload your sketches to your project account.  These don’t need to be your final ideas. 
  • Consider what materials the shelter will be made from: what materials will be durable against the weather and the riders who wait there?

sb1827's work for the Brainstorm Ideas step:

This is the floor plan of my bus shelter. I include a large bench, ATM, bus card machines, and vending machine

Rough draft of what my bus shelter may look like.Has a lot of open space in order to allow students to stand under roof

In this step, I made two sketches of what I would like my bus shelter to look like. I made on sketch of the floor plan, and one of the front view. From these sketches, my ideas will develop and my bus shelter will become more detailed and more suitable.

Curious about the Develop Solutions step of this bus shelter design project? >>

Show Hide

Now's the time to take what you've learned from the steps above to develop your solution for a BRT shelter.

Important! Since DiscoverDesign is about investigating the design process, the other people viewing your project - other students around the country, your teacher, and mentors - want to see how your ideas have changed over time. This means that while you're working on your digital model, you’ll want to be sure to keep re-saving it with a new file name every few days as you work through the steps.

Draw a sketch or use software such as Google SketchUp, AutoCAD, or Revit to illustrate your ideas.  You can upload photos (JPG files) from your SketchUp model, video fly throughs (FLV files) of your SketchUp model, or drawings (DWF files) from AutoCAD.

Try to include

  • One site plan
  • One floor plan
  • At least two elevation or perspective views

Try This

You may use any method you'd like to show your design (pencil, colored pencil, collage, physical models, or digital rendering software).  Here are a few suggestions for drawings and models of your BRT shelter:

  • Use cardboard or cardstock to build a rough physical study model or prototype of your shelter. You can't really understand the shape of the shelter until you make a quick study model. Don't worry about making a fancy finished model at this time. Instead, use cardstock, scissors, and tape to quickly create the large 3D form. See how it looks. Break off different sections, add new pieces, and try new ideas. Take photos of your model and upload them to this step.
  • Sketch or use software such as Google SketchUp, AutoCAD, or Revit to get the ideas out of your head to share with others.

sb1827's work for the Develop Solutions step:

ATM, bus machines and vending machines available to students

Large bench, overhanging roof for students to stand under, and CTA bus tracker

Front view of bus shelter

At this stage I started to throw my developing ideas into a simple design of the bus shelter I envisioned. I dont have all the components I want yet, but I have all the most of the main issues solved in this stage

Curious about the Final step of this bus shelter design problem? >>

Show Hide

A unique station on the world's first BRT system in Curitiba, Brazil.

The final step of the design process is to create more finished drawings that illustrate your ideas to others. Remember, your explanation text and the types of drawings, images, and models you share need to tell the whole story of your project to someone who may or may not have ever visited your site or even your city.

Continue to collect feedback from your peers, teachers and the online community to help you improve on your final design. Be sure to review and add constructive comments on the work of your classmates and other students who are solving the same design problem. If your ideas change, be sure to explain your thinking and let others know about the new work you have posted to your account.

You might want to share floor plans, elevations, renderings of your digital model, photos of a physical model, or a video animation of your model.

  • Review your design and test it against your original sucess statement that you wrote for the Overview. Does it meet this criteria?
  • Make a list of your ideas, sketches, and study models. For your final design you will want to write and post a short but effective paragraph of your process and the unique solutions you found developed. Tell us about your ideas.
  • Your teacher and architectural mentors will be looking for these things:
    1. originality in your design
    2. your ability to creatively solve the design challenge
    3. the quality of images, sketches, drawings, and models you have uploaded in each of the five design process steps (Overview, Collect Info, Brainstorm Ideas, Develop Solutions, and Final Design).
    4. As your ideas change, be sure to explain your thinking and let others know about the new work you have posted to your account. Go back to the virtual drawing board and revise your project based on the feedback of others.
    5. how well you have written about and explained your thinking in each of the design process steps

sb1827's work for the Final Design step:

DEFAULT

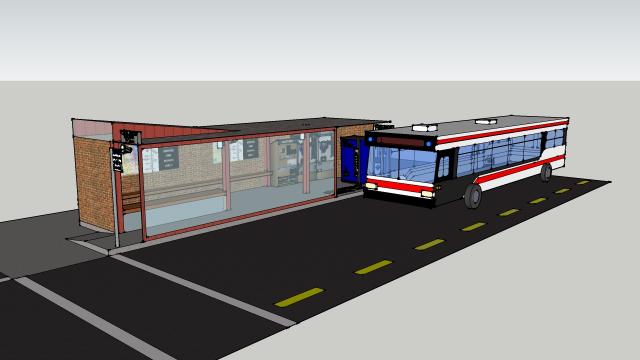
Front-Side view of finished bus shelter

DEFAULT

Great view of the long bench that I made angle around to seat more students.You can see the glass I included for more protection

DEFAULT

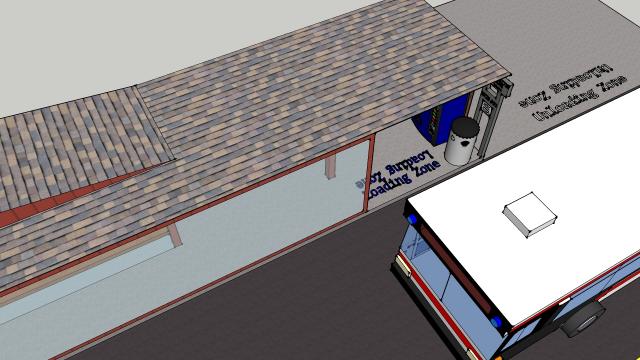
Top view displaying loading and unloading zone and general outline of shelter

DEFAULT

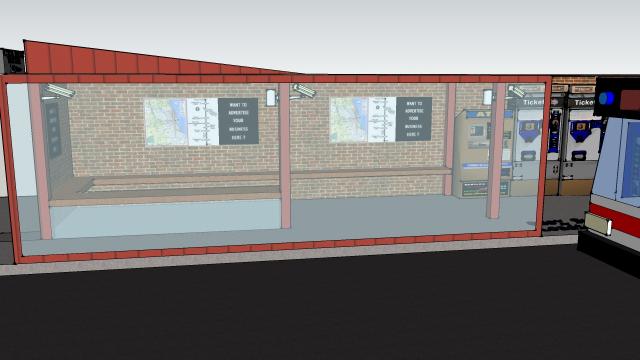
front view of finished bus shelter. You can see the protective glass, long/angled bench, cameras, lights, ads, maps, & machines

At this stage I wanted to make sure I including every aspect I wanted and covered every problem that the current bus shelters do not. I made sure to make it big enough for 30+ students to sit or stand, all covered by a roof and glass for protection. From the last stage, I including the protective glass, a winding bench for more seating, lights, cameras and a Loading/Unloading zone. This new bus shelter would be perfect to meet all the needs of the large student body.