Curious about the instructions for this bike shelter design problem? >>

Show Hide

Welcome Chicago Public High School students!
These are the instructions for entering a project in Division 6 for the 2012 Newhouse Architecture Competition.

Bike racks and bike rider amenities are given little attention when schools are planned, and bike riders have little infrastructure support for their choice to ride to work or school.

In order to support healthy lifestyles we are asking you to design a bike shelter that will provide safe and secure storage, protection from Chicago weather (year around), and some amenities that would be helpful for bike riders to have when they reach school.

The project will either replace your existing bike storage area OR you can find a new location that would better serve the school. You must identify and justify the new location (eg. - visibility is better, or there is more room to maneuver).

Check out the video below to get inspiration: 


In Curie, many students ride their bikes from their homes to the school, but since there is no bike shelter anywhere near, they’re forced to look for a temporary place where they can leave their bikes while they are in school.

As we all know, many people ride bikes to a lot of places. When the students come to school, they don’t really ride them to school because either they don’t want to leave them just put in the open or they don’t really know where to leave them to calm the nervousness that they might get stolen. With this bike shelter, the students can ride their bikes to the school and have a place where they can store and retrieve them easily. Also staff members would also be able to store their bikes there if they bring them instead of riding a car, bus, or train.

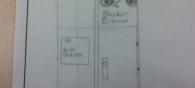
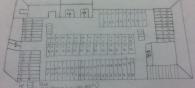
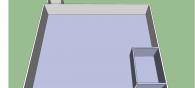
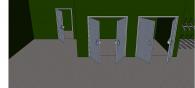
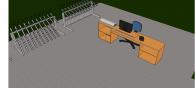
In the school, there is an unoccupied metal shop room that would be perfect for storing the bikes. The room is very wide and suitable for this idea. It also has a small pathway where the people with bikes can pass through to get inside the room & another small staircase to get out of the school. Inside the room there is a smaller room that can used to store tools for repairing the bikes or accessories needed to keep the bike safe. There will also be a section where they can have their bikes fixed and reestablished. With this open space, I desire to store about 100 bikes.
This new idea can be used to benefit not just the school but also the community. It can be an innovator that motivates other communities to do it too.

Comments

Very Good start.

This is the exact information you had last week. You've made no progress in the past week? You need to use your time more wisely.

Curious about the instructions for this bike shelter design problem? >>

Show Hide

In the Collect Info step of the design process, you try to gather as much information as possible about your school's existing bike storage facilities, along with the students and staff who will use it.  You can't propose new solutions until you figure out and document what the existing problems are.

Try This

  • Do a site visit of your bicycle parking facilities and make notes, sketches, and take photographs. Note conditions that are unsafe, unsecure, or that are less than ideal.
  • Look at other schools or public facilities to determine good / bad examples of how bikes are stored and if anything is done to accommodate riders needs when they get off their bike.
  • Interview bike users and ask them what they would like to have in a bike shelter at their school or place of work.   
  • Calculate the number of bikes that park over a week, also inquire if bikes are registered with the main office and if so how many are registered with the school.
  • Do an analysis at different times of the day and week and create an analysis with average usage and high / low points. Also determine if there are more bikes at the beginning of the week or end of the week.
  • Measure and draw the existing bike parking area and locate and note existing structures such as fencing, bike rack (notate the type and material), show the size of a bike and its clearances on the plan. Include dimensions.

jose0147's work for the Collect Information step:

Summary
I took some pictures of the current room that I'm planning to use as the new bike shelter. I also conducted a survey.
This is a point of view of the room.
This is an entrance of the room.
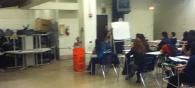
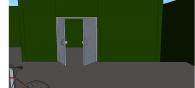
This is part of the unoccupied space. The rooom is under pretty bad conditions but it can be...
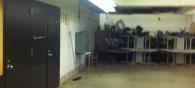
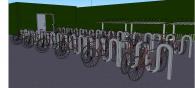
This is another part of the unsused room that I'm planning to use for my project. It's a...
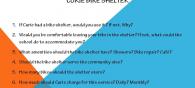
This is the survey that I conducted. From this survey, majority of the people would want a bike...

Curious about the instructions for this bike shelter design problem? >>

Show Hide

In the Brainstorm Ideas step of the design process, you put some early ideas down on paper that show what you've found in the Collect Info step. 

Try This

  • As you are observing and making notes think about how your bike shelter is taking shape. Make side notes of where new elements may go or how you would change what is currently in place.
  • Take note of unsafe conditions or conditions that do not make sense (For example, bicycles sticking out into a sidewalk or people having difficulty parking their bikes).
  • Sit and study photographs of your site visit. If you can print and write comments of what you remember and note where you might change things and how.

Test

jose0147's work for the Brainstorm Ideas step:

Summary
I drew some sketches from the room as it is and how it should look like with the bike racks already installed. I also drew the two entrances that the bike shelter should have.
Basic floor plan of the room being used for the bike shelter.
One of the entrances.
Another entrance.
The floor plan with the bike racks drawn out.

Curious about the instructions for this bike shelter design problem? >>

Show Hide

In the Develop Solutions step, your rough ideas come together with drawings and models that can show others your solutions for a new bike shelter.

Try This

  • Try out different ideas and save each “version”. You do not want to lose a good idea later!  Other people viewing your project - other students around the country, your teacher, and mentors - want to see how your ideas have changed over time. This means that while you're working on your digital model, you’ll want to be sure to keep re-saving it with a new file name every few days as you work through the steps.
  • Make a list of your ideas and associated sketches, or practice models. For your final upload you will want to write a short but effective paragraph of your process and what you found. This will inform the direction you will take for the final solution.
  • Show your ideas to your teacher and peers for some feedback. You can also review your progress with the test group you may have interviewed and test whether your design would meet their needs or address their concerns. Learn from the feedback you receive and incorporate into your final design solution.
  • Review your design and test it against your own observations and review that it has met the project requirements. Did it meet the expectations of the end users that you spoke to?
  • Do not leave work for the last minute! Going through a detailed design process requires time to gather information, develop ideas, and make improvements. This is difficult or impossible if you try to pull everything together a week before your project is due. Projects that are researched, developed, and well executed will always stand out!


jose0147's work for the Develop Solutions step:

Summary
My space for the bike shelter at my school exceeds 1000 square feet. The space that I chose is currently being used for in school suspension.
This is the plain building in google sketch up.
This section is the proposed bike shelter entrance.
This section of the bike shelter is where the registration desk would be.
This room is the proposed bike repair room.
This is the middle section of the shelter.

Curious about the instructions for this bike shelter design problem? >>

Show Hide

The final step of the design process is to create more finished drawings that illustrate your ideas to others. Remember, your explanation text, and the types of drawings, images, and models you share need to tell the whole story of your project to someone who may or may not have ever visited your school.

Be sure that you understand and meet all schedule deadlines and project data submission requirements.  

The Newhouse Competition judges will be evaluating your design project on:

  • The creativity of the final solution.
  • If you have included all studies, observations, data, and calculations utilized for determining capacities, design considerations, and scale of final project.
  • How well you showed the design process through sketches, notes, pictures, etc.
  • How well your projects incorporates the following components:

    Secure bike storage using common bike parking structures (bike racks), or some type of creative structure that is an “improvement” to what is currently installed and utilized at the school.

    Shelter from the weather – it can be enclosed or partially enclosed.

    Basic amenities: clean up or private shower facilities, personal lockers, small food kiosk or beverage bar, considerations for self performing bike maintenance, bike storage, information board(s).

    Consideration for use at all hours and seasons.


jose0147's work for the Final Design step:

Summary
Throughout the whole project, I learned that a bike shelter would benefit the school and the commuinity as a whole. This project can help people who ride their bikes to school.
This is the site plan with the bike shelter location included.
This is the floor plan for the bike shelter.
This is the current site plan.
This is an interior view of the bike repair room.
This is the bike part room.
This is a view of the registration desk with some bike racks.
This interior view shows most of the cnetral bike racks with the ones in the edges.