Overview Instructions

Show Hide

Welcome to the 2015 DiscoverDesign.org National High School Architecture & Design Competition!

This year's real-world design problem is to design a pocket park for your neighborhood or school. Click to view the 2015 rules and entry guidelines and registration. 

Check out the 2015 Top 10 Winners!

Design Challenge Background

Pocket parks have the ability to activate under-used or open spaces, and turn them into vibrant community spaces. No matter where they pop-up, they provide a unique place for people to gather, rest, play, or escape the hustle and bustle of the day. Cities across the country have been creating more and more pocket parks to bring neighborhoods to life & create a positive sense of place and pride for their community. A pocket park is a small park, typically build on a single vacant lot or on a small irregular piece of land, that is accessible to the general public.

Design Challenge Brief

 
Design a pocket park for a small piece of land near your school or in your neighborhood. Your design needs to provide spaces for groups to gather, spaces or activites for multiple age groups, and should be no bigger than 14,500 square feet. What might a park look like that is designed with community needs in mind, as opposed to a one-size-fits-all design?

A standard lot size in Chicago is 50'x125'. You could occupy two Chicago lots, adjust the dimensions, or find a lot in your neighborhood that does not exceed the square footage. Can't find an open space? Redesign one!

Your design should include a variety of elements that make a park... a park! From benches, bike shelters and meeting spaces, to playgrounds & pavilions, to cafes, information kiosks, or arts performance areas. You should also consider sustainability issues and the environmental impact of your design.


HINT: Click the little 1, 2, or 3 on the image to get more information and tips throughout the project! 

A pocket park is a small park accessible to the general public on a single lot | Photo courtesyof sourcethestation.com

What should I upload?

For your Overview, it is important to post a short, but clear, ‘success statement’ that communicates the goals you hope to solve and achieve through your design solutions. When you’re nearly finished with your design project, you can go back to this success statement to see if your design has met the criteria you first proposed.

For each step along the Design Process we'll give you some suggestions on what to think about, try out, and upload.

Cal Craven
4-20-15
1st
Discover Design Pocket Parks: Problem Statement for the "Vesty" Pocket Park
A pocket park (also known as a parkette, mini-park, vest-pocket park or Vesty park) is a small park accessible to the general public. Pocket parks are frequently created on a single vacant building lot or on small, irregular pieces of land. They also may be created as a component of the public space requirement of large building projects.
Pocket parks can be urban, suburban or rural, and can be on public or private land. Although they are too small for physical activities, pocket parks provide greenery, a place to sit outdoors, and sometimes a children's playground. Any place that space is tight is ideal for a pocket park, as the users want to use a space that wouldn’t normally include a natural setting.
In highly urbanized areas, particularly downtowns where land is very expensive, pocket parks are the only option for creating new public spaces without large-scale redevelopment. In inner-city areas, pocket parks are often part of urban regeneration plans and provide areas where wildlife such as birds can establish a foothold. Unlike larger parks, pocket parks are sometimes designed to be fenced and locked when not in use.
Small parks can increase the value of nearby homes, and provide the inhabitants of those homes a place to get away and enjoy themselves in a place that’s fun and visually appealing. (http://en.wikipedia.org/wiki/Pocket_park)

I ended up choosing my location as Crocker Park in Westlake, which is a mixed use area for both commercial and residential interactions. Throughout the beginning stages of the project, I did research and finally concluded on this area for my pocket park as it is the best place in Westlake for integrating what a pocket park really is, a piece of nature where there shouldn't be one.

Overview of the problem
-How can we integrate a natural place that will bring a multitude of people together to enjoy themselves in an area that does not naturally accommodate such needs?
Things to consider:
- Orientation
- The surrounding area (what would they need out of this park)
- Being efficient with space (do we need to use all of this space?)
- The people who would be using it
- What things do people enjoy in such a space (aka what goals is this space trying to accomplish)?
Amenities to include:
- Benches
- bike shelters
- meeting spaces
- playgrounds & pavilions
- cafes
- information kiosks
- arts performance areas

Comments

The ideas developed in early sketches were carried through well in the final park design. Project was modeled well in 3D.

Collect Instructions

Show Hide

Upload a quick sketch of your ideas! | San Francisco park sketch, photo courtesy of ArchitectureForHumanity.org

Collect Information

In the Collect Info step of the design process, you try to gather as much information as possible about your existing school or community parks and spaces, along with the students, staff and neighbors who will use it.  You can't propose new solutions until you figure out and document what the existing problems are.

What makes a park?

No two parks are the same, so what is it that turns a park from just a plot of land to a vital community space? Take a look at parks near your school, home, work, neighborhood, and city! For the Collect Info step of the Design process you'll gather notes, sketches, photos, videos, etc. of your observations and research. 

Try This

  • Walk around your school grounds and a neighborhood park. Take pictures of what makes that space a "park".
  • Visit Flickr or another photo sharing site and search for types of parks. Determine good and bad examples of how parks meet the needs of their community - for all ages.
  • Post images of buildings, colors, designs, textures, or other things that inspire you in this step. Make sure you give credit to your source!
  • Don't forget to explain your thinking in writing for every image you upload! Tell us why it's important and how it's impacting your thinking.

Think about

  • What kind of outdoor spaces does your school have? Would you consider them a "park"? Why or why not?
  • What kind of parks are in your community? What do you like or dislike about them?
  • Who uses parks? How do different people use parks? Do they all use them the same way or differently?

Colorful sheltered playground at Fuji-Hakone-Izu National Park, Japan

What types of structures do parks have?

No two parks are the same - each is designed with a specific community and use in mind. Therefore, there are many different types of activities and spaces for people of all ages to enjoy and interact with. Here are a few ideas to kick start your research (Hint: these are great words to search in Google Images!).

Adventure playgrounds

While professional designers used to play a major role in the design of playgrounds around the world, the playground often seen today is a primary-colored collection of plastic equipment with predetermined uses, leaving little room for children’s imaginations. Landscape architects such as Michael Van Valkenburgh are now incorporating different kinds of play spaces into their designs, including in the new Maggie Daley park in Chicago. These ‘adventure playgrounds,’ as they are often called, are made of natural materials and sculpted landscapes with abstract shapes and materials, allowing for the most freedom for imagination.

www.toxel.com 

Bicyle Shelters

Outdoor bicycle shelters can be both functional and beautiful in a park space. They offer park visitors a place to lock up their bikes and protect them from the weather.  Great places to store bikes safely and in an interesting way can encourage community members to ride their bikes more, and be sure to make a stop at your pocket park! A company called Park-a-Bike specializes in creating these structures - Learn more HERE!

Ruby Hill Park in Denver, CO | Photo courtesy of levittdenver.org

What types of structures do parks have?

Looking for even more information? What kinds of pavilions or structures have you noticed in parks near you? Have you ever seen a parklet? Here's some inspiration:

Pavilions

Pavilions can be in many forms or functions. Some are simple and protect picnickers from a rainy afternoon. Others are sculptural, outdoor park kiosks, or for community performances

Think about: What kind of pavilion would your neighborhood benefit from? What examples can you find? What do you like or dislike about them? Why?

Once you choose a kind of pavilion, you'll need to think about what it needs to have inside and out. Here are some things you may want to include in your design:

  • public and/or private use spaces
  • bathrooms
  • storage rooms for food, supplies, or winter storage
  • seating for performances or gathering
  • tables and chairs; benches
  • functional spaces based on your specific pavilion: a kitchen, backstage, open outdoor areas, information windows, etc.

www.behance.net

Parklets

Take inspiration from these tiny parks that pop up in unexpected places like parking spots. Many of these parklets are created by community members looking to activate a space in their own neighborhood, and are moveable, foldable, and able to literally pop-up anywhere!

Think about: What do you notice about their use of space? What kinds of activities can they accomodate in just one parking spot?

www.wrtdesign.com

triplec96's work for the Collect Information step:

Summary
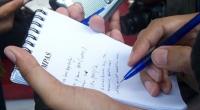
I collected information in a variety of ways. My first big step was to decide on a location.
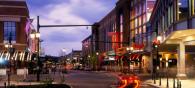
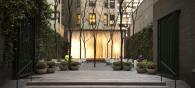
This is an image of the area that I would be building my pocket park for. Looking at my overview,...
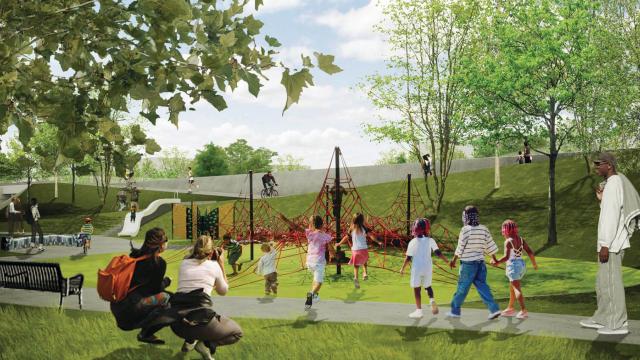
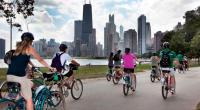
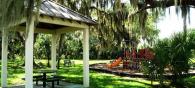
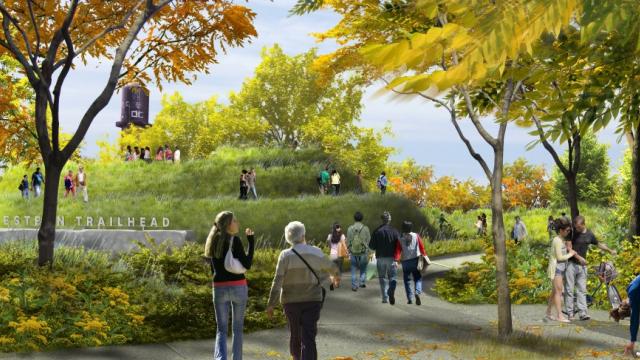
This is Laurel Pocket Park, located in California. The park was built in an urban environment, in...
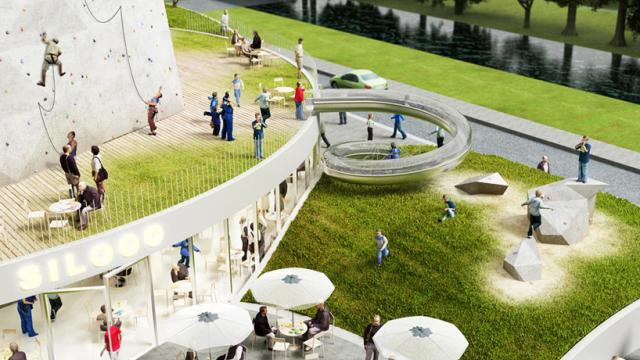
This is an article I found that looks at some of the best pocket parks out there (http://...
This is a newspaper article detailing the use of pocket parks in Los Angeles (http://www.latimes....
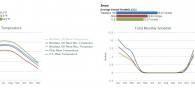
Here is some quick research I did on the weather of this area. This is more for any readers of my...
This is a community brief written by Alison Blake about Pocket Parks (http://depts.washington.edu/...
This here is supposed to be a google earth video of the surrounding crocker park area. However, as...

Brainstorm Instructions

Show Hide

Silver Spring Metro Pocket Park | Photo courtesy of eleven55ripley.com

Brainstorm Ideas

In the Brainstorm Ideas step of the design process, you will develop ideas from all of the information you've collected. You will start to be inspired by new places and you put some early ideas down on paper that show what you've found in the Collect Info step. You also might take more photos to show specific new ideas you have. 

The simple diagrams you make here will help you understand how the  pocket park location and design compare with your new ideas.

Try This

  • Draw a floorplan or siteplan of your parks existing facilities. How are all of the different spaces connected? What are the different pathways you can take through all of these spaces? Map all of these structures and spaces.
  • Use Google Maps to view and print out an aerial photo of your park. Take measurements of the overall dimensions of the area, of both structures and outdoor spaces and use the aerial to map out the measurements.
  • Post this aerial map and sketch here so everyone can understand the relationship between your school building, the neghborhood, park spaces available, and the proposed site of your new park or redesigned park features. Describe the surrounding area and note existing structures such as paths, seating, bike racks, pavilions, playgrounds, concession stands, and any fences. 
  • On a piece of tracing paper placed over the aerial photo of your school, sketch a diagram showing a large arc around the building to show the path of the sun throughout the day.  This drawing is called a site analysis diagram.  (Remember, the sun rises in the east and sets in the west.)

Landuse Map in Cary, North Carolina | Photo courtesty of townofcary.org

Think About

  • Will your new pocket park replace your school or neighborhood's existing park spaces or become an addition to a different part of the community? Will it be built in an empty lot or space?  Will it be between buildings, out in a field, or built on the roof?  You decide.
  • Spend some time looking at the aerial photo of the area you select.  What types of other buildings surround your the site?  Homes, businesses, parks, parking lots, or an empty field?  How will these other buildings impact the design of your new athletic pavillion? Create a land-use map!
  • What types of streets surround your school? Are they busy or quiet? What types of streets are in your neighborhood? What might be the best place for people to relax and play?
  • Based on the site analysis diagram you've sketched, where is the sun located throughout the school day?
  • How can the structures and outdoor areas of your new pocket park be positioned to take advantage of the sunlight for good lighting?

triplec96's work for the Brainstorm Ideas step:

Summary
I took my research to the next step, and actually visited my site and started to develop my personal design.
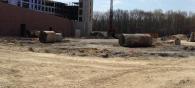
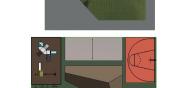
This is the current setting of where I want to develop my park. The picture was taken facing South...
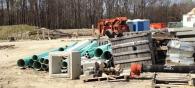
Now the picture is showing you the current space in a western direction. You can see a thin...
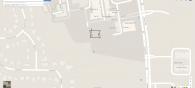
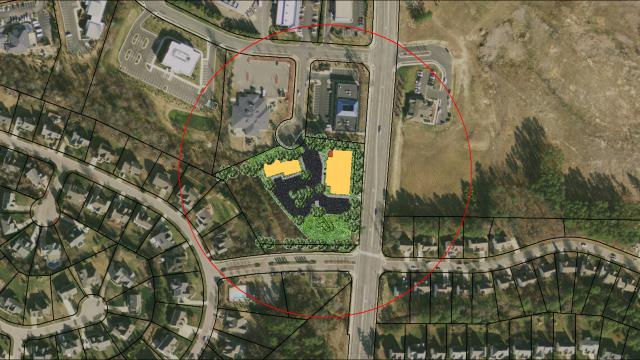
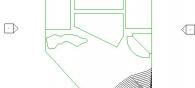
This is an overview of the area seen from google maps. This makes it easier to visualize the space...
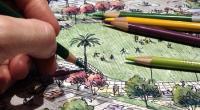
These are some quick sketches to show some preliminary thoughts on orientation of spaces.
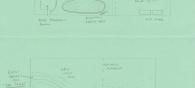
Now here are some more expansive sketches that show a 2-D basic rectangular layout so I could...
Here is a quick brainstorm list of things I want to include going into my final step. As I have...
TRIZ 40 is a brainstorming process called the theory of inventive problem solving. It works by...

Develop Instructions

Show Hide

Pocket Park with Bocce Ball court | Photo courtesy of Lennar

Develop Solutions

You've been gathering all sorts of information, and brainstorming creative options for your pocket park. Now it's time to put all the pieces together and make some final decisions. In the Develop Solutions step, your rough ideas come together with drawings and models that can show others your solutions for a new pocket park.

Try This

  • Try out different ideas and save each “version”. You do not want to lose a good idea later!  Other people viewing your project - other students around the country, your teacher, and mentors - want to see how your ideas have changed over time. This means that while you're working on your digital model, you’ll want to be sure to keep re-saving it with a new file name every few days as you work through the steps.
  • Make a list of your ideas and associated sketches, or practice models. For your final upload you will want to write a short but effective paragraph of your process and what you found. This will inform the direction you will take for the final solution.
  • Show your ideas to your teacher and peers for some feedback. You can also review your progress with the test group you may have interviewed and test whether your design would meet their needs or address their concerns. Learn from the feedback you receive and incorporate into your final design solution.
  • Do not leave work for the last minute! Going through a detailed design process requires time to gather information, develop ideas, and make improvements. This is difficult or impossible if you try to pull everything together a week before your project is due. Projects that are researched, developed, and well executed will always stand out!

CAD rendering of a park space | Photo courtesy of ivarskalvans.blogspot.com.jpg

Think About

  • Are you reaching your success statement? Review your design and test it against your own observations and review that it has met the project requirements. Did it meet the expectations of the end users that you spoke to? Who is in your community?
  • How do you imagine people will interact with your new pocket park? What will your design contribute to the neighborhood? Why? How so?
  • You have designed with community in mind. What role does the community play in any architect's plans? Talk about it.
  • Keep your park full of activity! How will your park be used in different seasons or weather? Have you been imagining different events or programs that could happen here? Tell us about it! (Check out the High Line in the blue sidebar for some ideas...)

triplec96's work for the Develop Solutions step:

Summary
I developed solutions by first looking at how I wanted the space oriented, and then doing sketches to see what were the best ways to fit things into these spaces.
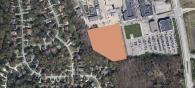
This is the orientation of park that makes the most sense in the area. Obviously it has to keep a...
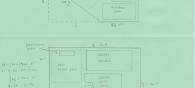
These are some more serious sketches. The math on either side of each sketch is just figuring out...
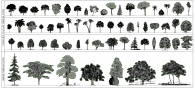
http://www.plantnative.org/rpl-inoh.htm is a great list of common types of vegetation that grow...
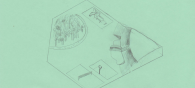
Here is a 3-d sketch showing my thought process at this point. I have two different designs that...
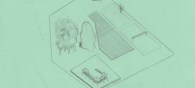
Here is a sketch of a second design for the park. I particularly like how close the public eating...
Here was my work on revit to try and bring this version of "Vesty" Park to life. However...
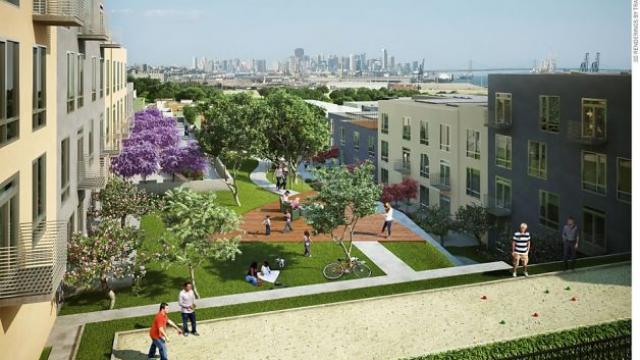
Here is the view that I was obsessed with and led to this design, so I just wanted to share it with...

Final Instructions

Show Hide

Chicago's 606 bike paths and parks transform an old defunct railway | Photo courtesy of the606.org

Final Design

You're almost there! The Final Design step of the design process is to create more finished drawings and models that illustrate your ideas to others. Remember, your explanation text, and the types of drawings, images, and models you share need to tell the whole story of your project to someone who may or may not have ever visited your neighborhood or pocket park site.

Try This

  • Review your design and test it against your original sucess statement that you wrote for the Overview. Does it meet this criteria?
  • You might want to share floor plans, elevations, renderings of your digital model, photos of a physical model, or a video animation of your model.
  • Be sure to comment on other projects in the competition to foster, encourage, and build an online design community of learners in DiscoverDesign. Who knows, they might just have a great idea to help bring your project to the next level!  CAF will also recognize students that provide both encouragement and constructive criticism on students' work throughout the run of the competition.

Multi-use pocket park proposal | Photo courtesy of archreview.blogspot.com.jpg

Think About

  • Does your final design meet the expectations of the students, community members, and/or school staff   that you interviewed?  If not, you may need to go back to the drawing board and revise your design. 
  • For your final design, you will want to post a short but effective paragraph of your process and the unique solutions you found and developed. Tell us about your ideas and how they may or may not have changed over the course of the project.
  • What essential skills have you learned? Think about where you started this class or project and what you know now. Practice writing about this here - it might come in handy for a job or college application!

triplec96's work for the Final Design step:

Summary
So at this stage, I figured out exactly where I wanted to go with my final design, so I did a quick sketch and then moved to revit to finish it up. Here are my final results. Enjoy
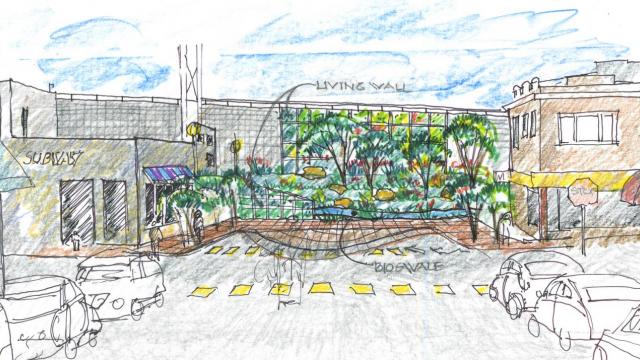
Here is a sketch of a better design that incorporates more of what I think is necessary in my park...
So here is where I started with it on Revit. I just mapped out spaces to make sure everything would...
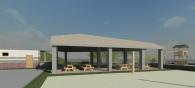
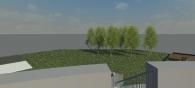
This is an image standing standing on the north edge of the park and looking into the park, as if...
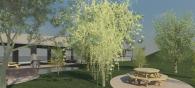
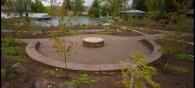
On the opposite side from the previous image, we have the quiet sitting area. Separated from the...
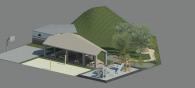
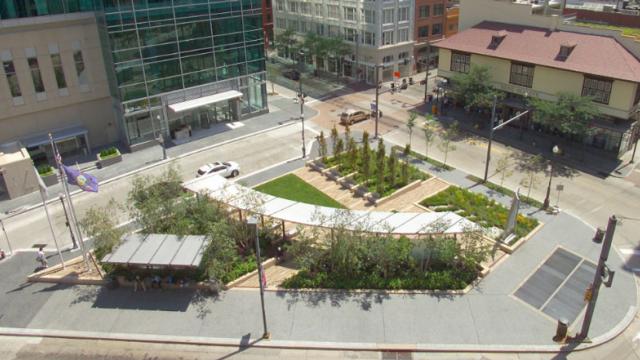
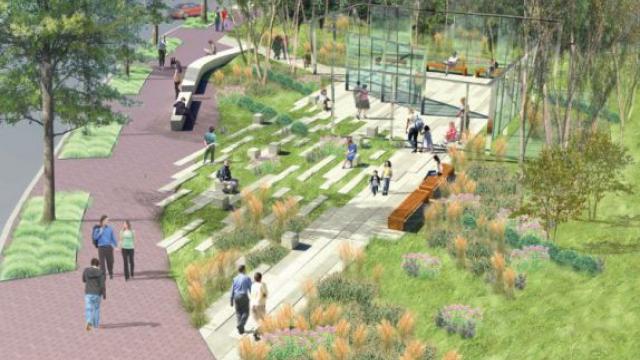
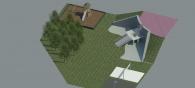
Here is a full isometric view of the park. You can see how the space flows, and just how pretty and...
Here is both a rendered and shaded top view of the park. You can see how little cement I included...
Here are just the overall features to my finished park. I tried to put a heavy focus on...